Quick Start for Pro Custodibus On-Premises
The fastest way to start hosting Pro Custodibus on your own premises is to use our pre-built Docker containers for the Pro Custodibus API server, database, and app UI. This article will show you how to quickly set up the Pro Custodibus Community Edition in a local test configuration with Docker.
|
Tip
|
To get started with the Pro Custodibus Software as a Service Edition, see our classic Getting Started With Pro Custodibus article instead. |
The on-premises editions of Pro Custodibus are composed of three core components:
-
API Server (aka the API)
-
App Web UI (aka the app)
In addition, the Pro Custodibus agent is run on each WireGuard host you want to manage. We will set up these core components, plus a couple of agents, with the following steps:
Generate Docker-Compose File
To get started, we’ll run the generate-docker-compose.sh script from the API source-code repository to generate a docker-compose.yml file for us (plus several other configuration files).
First, create a directory for the docker-compose.yml file (and other config files), and change to it:
$ sudo mkdir -p /srv/containers/procustodibus
$ sudo chown $USER:$(id -g) /srv/containers/procustodibus
$ cd /srv/containers/procustodibus
Then run the script:
$ curl -L -c /tmp/srht.cookies -b /tmp/srht.cookies https://git.sr.ht/~arx10/procustodibus-api/blob/main/ops/install/generate-docker-compose.sh | bash -s
|
Tip
|
To use the Enterprise Edition instead of the Community Edition, run the script with |
This script will prompt for several necessary configuration settings. Since we simply want to set up Pro Custodibus in a local test configuration, we’ll set its canonical URL to http://localhost:8123.
|
Tip
|
If you wanted to monitor WireGuard on different computers other than the local machine on which you are running the script, you would need to use a canonical URL by which those computers could access the local machine (such as |
So when the script prompts for canonical URL host, enter localhost:
The "canonical" URL is the URL end-users enter into their browser to access
Pro Custodibus. For example, "https://pro.custodib.us" is the canonical URL of
the SaaS edition. With this URL, the host is "pro.custodib.us", the scheme is
"https", and the port is "443" (the default for the scheme).

For on-premises editions, we recommend setting the canonical URL to one like
the following, where your organization controls the domain name "example.com":

https://procustodibus.example.com

Enter the canonical URL host (eg procustodibus.example.com): localhost
And when the script prompts for canonical URL scheme, enter http:
Enter the canonical URL scheme (default https): http
And when the script prompts for canonical URL port, enter 8123 (or any other free TCP port on the local machine):
Enter the canonical URL port (default 80): 8123
For our test configuration, we won’t connect Pro Custodibus to a proper SMTP server, so simply press the enter key (to accept the default) when the script prompts for SMTP server address:
Enter the SMTP server address (default host.docker.internal):
Without a working SMTP server, the next setting won’t matter, so again simply press enter the enter key when the script prompts for ‘From’ address:
NOTE: If this SMTP server requires SSL or authentication, you must configure it
via the environment variables in the api.env file.
Enter the 'From' address emails will use (default procustodibus@localhost):
The script will download a few configuration templates from the API and app source-code repositories, and save them to the current working directory, along with the generated docker-compose.yml file:
$ tree
.
├── acme-challenge
├── api.env
├── app.env
├── config
│   └── license
├── docker-compose.yml
├── initdb
│   └── init.sql
├── letsencrypt
├── nginx
│   └── procustodibus.conf
└── work

7 directories, 5 files
Run Docker-Compose
Next, start up the generated docker-compose.yml file:
$ sudo docker-compose up
Creating network "procustodibus_default" with the default driver
Creating volume "procustodibus_db" with default driver
Pulling api (docker.io/procustodibus/api-ce:)...
latest: Pulling from procustodibus/api-ce
7dbc1adf280e: Already exists
afc991f829fb: Pull complete
6be012194d4c: Pull complete
4f4fb700ef54: Pull complete
0ab2a6894042: Pull complete
Digest: sha256:5149d19733a805f206d9f7edea0bdf211118f5e5c45de68c21b6a0bdd46aa85d
Status: Downloaded newer image for procustodibus/api-ce:latest
Pulling app (docker.io/procustodibus/app-ce:)...
latest: Pulling from procustodibus/app-ce
7264a8db6415: Already exists
518c62654cf0: Already exists
d8c801465ddf: Already exists
ac28ec6b1e86: Already exists
eb8fb38efa48: Already exists
e92e38a9a0eb: Already exists
58663ac43ae7: Already exists
2f545e207252: Already exists
34bcf9cb4530: Pull complete
5f648ab5a3b3: Pull complete
4b54e7391d1f: Pull complete
4f4fb700ef54: Pull complete
Digest: sha256:538b15d6b858be17e030f491297813587bfcf1835f5e9b3c3bb3d662efd9b44c
Status: Downloaded newer image for procustodibus/app-ce:latest
Creating procustodibus_db_1  ... done
Creating procustodibus_api_1 ... done
Creating procustodibus_app_1 ... done
Attaching to procustodibus_app_1, procustodibus_api_1, procustodibus_db_1
app_1  | 2023/10/02 20:53:47 [notice] 13#13: using the "epoll" event method
app_1  | 2023/10/02 20:53:47 [notice] 13#13: nginx/1.25.2
app_1  | 2023/10/02 20:53:47 [notice] 13#13: built by gcc 12.2.1 20220924 (Alpine 12.2.1_git20220924-r10)
app_1  | 2023/10/02 20:53:47 [notice] 13#13: OS: Linux 6.2.0-32-generic
app_1  | 2023/10/02 20:53:47 [notice] 13#13: getrlimit(RLIMIT_NOFILE): 1048576:1048576
app_1  | 2023/10/02 20:53:47 [notice] 13#13: start worker processes
app_1  | 2023/10/02 20:53:47 [notice] 13#13: start worker process 14
app_1  | 2023/10/02 20:53:47 [notice] 13#13: start worker process 15
app_1  | 2023/10/02 20:53:47 [notice] 13#13: start worker process 16
app_1  | 2023/10/02 20:53:47 [notice] 13#13: start worker process 17
db_1   | The files belonging to this database system will be owned by user "postgres".
db_1   | This user must also own the server process.
db_1   |
db_1   | The database cluster will be initialized with locale "en_US.utf8".
db_1   | The default database encoding has accordingly been set to "UTF8".
db_1   | The default text search configuration will be set to "english".
db_1   |
db_1   | Data page checksums are disabled.
db_1   |
db_1   | fixing permissions on existing directory /var/lib/postgresql/data ... ok
db_1   | creating subdirectories ... ok
db_1   | selecting dynamic shared memory implementation ... posix
db_1   | selecting default max_connections ... 100
db_1   | selecting default shared_buffers ... 128MB
db_1   | selecting default time zone ... UTC
db_1   | creating configuration files ... ok
db_1   | running bootstrap script ... ok
api_1  | 20:53:48.935 [error] Postgrex.Protocol (#PID<0.167.0>) failed to connect: ** (DBConnection.ConnectionError) tcp connect (db:5432): connection refused - :econnrefused
api_1  | 20:53:48.935 [error] Postgrex.Protocol (#PID<0.166.0>) failed to connect: ** (DBConnection.ConnectionError) tcp connect (db:5432): connection refused - :econnrefused
db_1   | performing post-bootstrap initialization ... sh: locale: not found
db_1   | 2023-10-02 20:53:48.957 UTC [30] WARNING:  no usable system locales were found
db_1   | ok
db_1   | syncing data to disk ... initdb: warning: enabling "trust" authentication for local connections
db_1   | initdb: hint: You can change this by editing pg_hba.conf or using the option -A, or --auth-local and --auth-host, the next time you run initdb.
db_1   | ok
db_1   |
db_1   |
db_1   | Success. You can now start the database server using:
db_1   |
db_1   |     pg_ctl -D /var/lib/postgresql/data -l logfile start
db_1   |
db_1   | waiting for server to start....2023-10-02 20:53:49.911 UTC [36] LOG:  starting PostgreSQL 15.3 on x86_64-pc-linux-musl, compiled by gcc (Alpine 12.2.1_git20220924-r10) 12.2.1 20220924, 64-bit
db_1   | 2023-10-02 20:53:49.916 UTC [36] LOG:  listening on Unix socket "/var/run/postgresql/.s.PGSQL.5432"
db_1   | 2023-10-02 20:53:49.933 UTC [39] LOG:  database system was shut down at 2023-10-02 20:53:49 UTC
db_1   | 2023-10-02 20:53:49.950 UTC [36] LOG:  database system is ready to accept connections
db_1   |  done
db_1   | server started
db_1   |
db_1   | /usr/local/bin/docker-entrypoint.sh: running /docker-entrypoint-initdb.d/init.sql
db_1   | CREATE ROLE
db_1   | CREATE DATABASE
db_1   |
db_1   |
db_1   | waiting for server to shut down...2023-10-02 20:53:50.108 UTC [36] LOG:  received fast shutdown request
db_1   | .2023-10-02 20:53:50.119 UTC [36] LOG:  aborting any active transactions
db_1   | 2023-10-02 20:53:50.122 UTC [36] LOG:  background worker "logical replication launcher" (PID 42) exited with exit code 1
db_1   | 2023-10-02 20:53:50.122 UTC [37] LOG:  shutting down
db_1   | 2023-10-02 20:53:50.127 UTC [37] LOG:  checkpoint starting: shutdown immediate
db_1   | 2023-10-02 20:53:50.247 UTC [37] LOG:  checkpoint complete: wrote 927 buffers (5.7%); 0 WAL file(s) added, 0 removed, 0 recycled; write=0.045 s, sync=0.054 s, total=0.125 s; sync files=257, longest=0.009 s, average=0.001 s; distance=4226 kB, estimate=4226 kB
db_1   | 2023-10-02 20:53:50.271 UTC [36] LOG:  database system is shut down
db_1   |  done
db_1   | server stopped
db_1   |
db_1   | PostgreSQL init process complete; ready for start up.
db_1   |
db_1   | 2023-10-02 20:53:50.384 UTC [1] LOG:  starting PostgreSQL 15.3 on x86_64-pc-linux-musl, compiled by gcc (Alpine 12.2.1_git20220924-r10) 12.2.1 20220924, 64-bit
db_1   | 2023-10-02 20:53:50.384 UTC [1] LOG:  listening on IPv4 address "0.0.0.0", port 5432
db_1   | 2023-10-02 20:53:50.384 UTC [1] LOG:  listening on IPv6 address "::", port 5432
db_1   | 2023-10-02 20:53:50.394 UTC [1] LOG:  listening on Unix socket "/var/run/postgresql/.s.PGSQL.5432"
db_1   | 2023-10-02 20:53:50.406 UTC [52] LOG:  database system was shut down at 2023-10-02 20:53:50 UTC
db_1   | 2023-10-02 20:53:50.417 UTC [1] LOG:  database system is ready to accept connections
api_1  | 20:53:50.760 [info] initializing database
api_1  | 20:53:52.759 [info] database initialized successfully
api_1  | 20:53:53.024 [info] == Running 20200101000000 Api.Repo.Migrations.CreateSuperArcemOrganization.up/0 forward
api_1  | 20:53:53.041 [info] == Migrated 20200101000000 in 0.0s
api_1  | 20:53:53.073 [info] == Running 20230915091812 Api.Repo.Migrations.CreateSystemAuthnChallengesTable.change/0 forward
api_1  | 20:53:53.073 [info] create table system_authn_challenges
api_1  | 20:53:53.099 [info] create index system_authn_challenges_pub_id_index
api_1  | 20:53:53.111 [info] == Migrated 20230915091812 in 0.0s
api_1  | 20:53:55.863 [info] Running ApiWeb.Endpoint with cowboy 2.10.0 at :::4000 (http)
api_1  | 20:53:55.883 [info] Access ApiWeb.Endpoint at http://localhost:8123
Once all the Docker images have been pulled and the containers started, we’ll see a line like the following, indicating that the API is up and running:
api_1 | 20:53:55.883 [info] Access ApiWeb.Endpoint at http://localhost:8123
Create Initial User
Now we can create an initial user with which to log into Pro Custodibus. Copy the URL printed out above (http://localhost:8123), and navigate to it in a web browser, appending /signup to the end of the URL to display the Sign Up page (eg http://localhost:8123/signup):
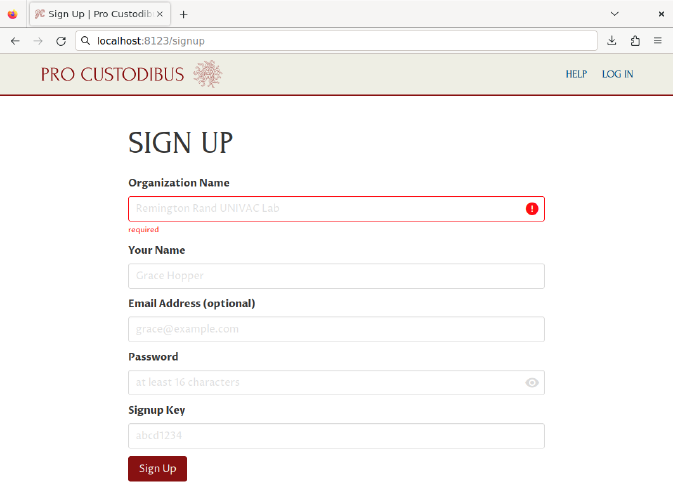
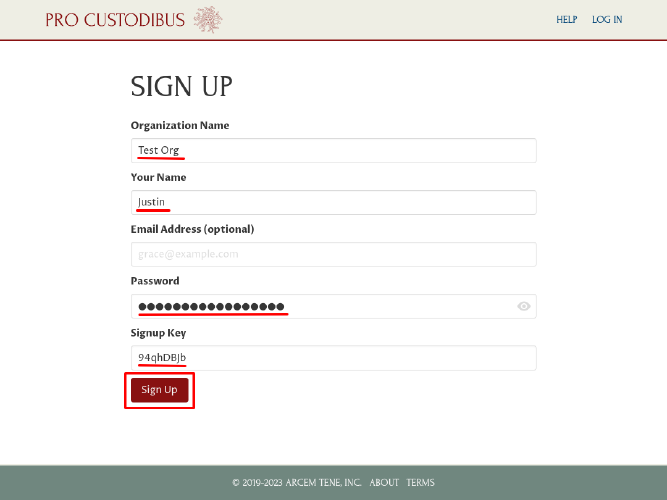
On the Sign Up page form, enter a display name for our test organization into the Organization Name field. Enter a display name for yourself into the Name field, and a 16-character or longer password into the Password field.
For the Signup Key field, open up the api.env file that the generate-docker-compose.sh script generated as a sibling of the docker-compose.yml file, and locate the SIGNUP_KEY environment variable.
|
Tip
|
Use |
Copy the value of the SIGNUP_KEY environment variable, and paste it into the Signup Key field. Then click the Sign Up button:
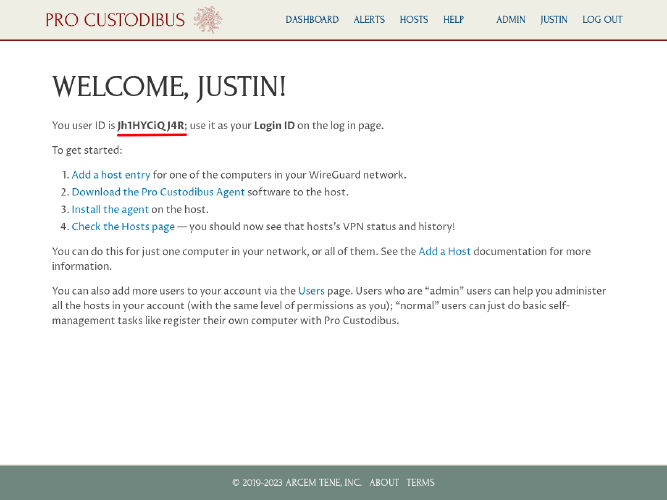
This will create an initial organization and admin user to use with Pro Custodibus. Write down the Login ID presented on the Welcome page along with the password entered on the Sign Up page (or save it in your password manager) in order to log in as this user later:
Add First WireGuard Host
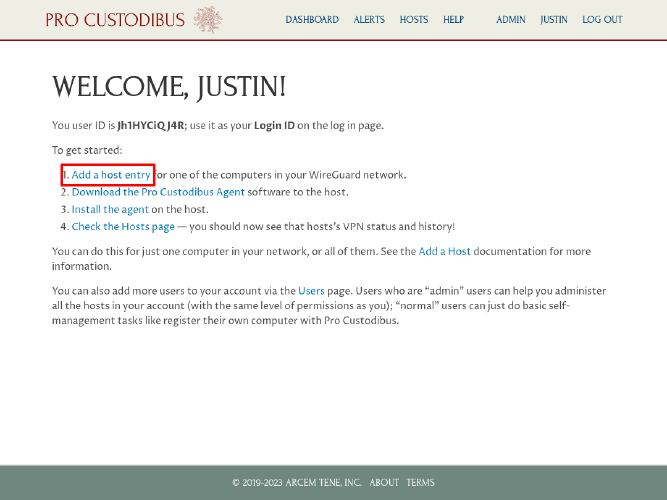
Now that our on-premises Pro Custodibus instance is up and running, we can register our first WireGuard host with it. On the Welcome page, click the Add a host entry link:
On the Add Host page, enter a display name for the host in the Name field, and then click the Add button:
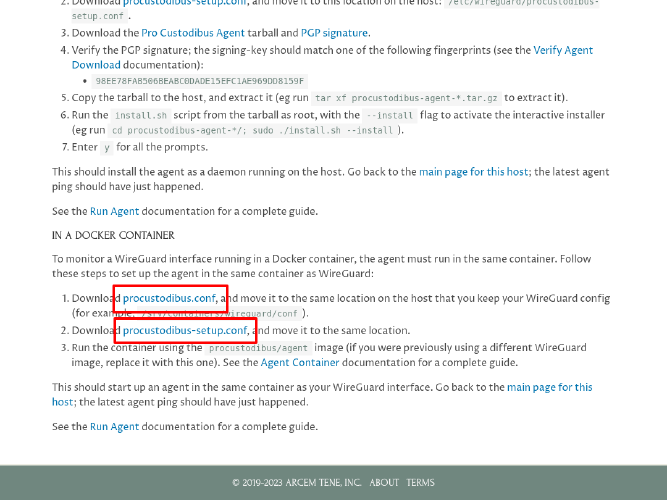
Download the procustodibus.conf and procustodibus-setup.conf files from the resulting Set Up First Host page:
Run Pro Custodibus Agent
If we were going to run the Pro Custodibus agent on some other host, we’d copy the procustodibus.conf and procustodibus-setup.conf files to that other host. But since this is a simple local test environment, we’ll just run the agent as another container on the same host as the other Pro Custodibus containers.
But first, we need to make one change to the procustodibus.conf configuration file. Its Api configuration setting is pointed to localhost (the canonical URL host we configured in the Generate Docker-Compose File step earlier):
# procustodibus.conf generated 10/2/2023, 2:20:22 PM PDT
[Procustodibus]
# First Host Agent
Agent = j7XiH3iPEwB
# First Host
Host = DWy736r1L8Q
Api = http://localhost:8123/api
When we run the agent in its own a container, however, localhost will resolve to the agent’s container, not to the container host. We need to change this to host.docker.internal in order for the agent to be able to access the container host:
# procustodibus.conf generated 10/2/2023, 2:20:22 PM PDT
[Procustodibus]
# First Host Agent
Agent = j7XiH3iPEwB
# First Host
Host = DWy736r1L8Q
Api = http://host.docker.internal:8123/api
Make that change, and then move the procustodibus.conf and procustodibus-setup.conf files into a new wireguard directory for the test “First Host” container:
$ sudo mkdir -p /srv/containers/first-host/wireguard
$ sudo chown -R $USER:$(id -g) /srv/containers/first-host
$ mv ~/Downloads/procustodibus.conf /srv/containers/first-host/wireguard/.
$ mv ~/Downloads/procustodibus-setup.conf /srv/containers/first-host/wireguard/.
|
Tip
|
If you are using SELinux, you may need to run the |
Next, save a test WireGuard configuration file as wg0.conf in the same directory:
# /srv/containers/first-host/wireguard/wg0.conf

# local settings for First Host
[Interface]
PrivateKey = AAAAAAAAAAAAAAAAAAAAAAAAAAAAAAAAAAAAAAAAAEE=
Address = 10.0.0.1/32
ListenPort = 51821

# remote settings for Second Host
[Peer]
PublicKey = fE/wdxzl0klVp/IR8UcaoGUMjqaWi3jAd7KzHKFS6Ds=
Endpoint = host.docker.internal:51822
AllowedIPs = 10.0.0.2/32
This test WireGuard configuration will simply connect to the Second Host WireGuard configuration (which we’ll create later in the Run Another Agent step), running on the same container host.
Finally, run the following command to start up the Pro Custodibus agent in a new container with our First Host config files:
$ sudo docker run \
    --add-host host.docker.internal:host-gateway \
    --cap-add NET_ADMIN \
    --name first-host \
    --publish 51821:51821/udp \
    --rm \
    --volume /srv/containers/first-host/wireguard:/etc/wireguard:Z \
    docker.io/procustodibus/agent
Unable to find image 'procustodibus/agent:latest' locally
latest: Pulling from procustodibus/agent
96526aa774ef: Already exists
7839c9884666: Pull complete
a177a5fd7dde: Pull complete
449a55657c8e: Pull complete
5aa597564e4d: Pull complete
b9ef3abcde24: Pull complete
309cec138fbc: Pull complete
5b330b42597a: Pull complete
8774be960881: Pull complete
Digest: sha256:6e61c0b6a095e12bb0afb16806ab409cec5ad1817c53a31db1dcbcad995240bb
Status: Downloaded newer image for procustodibus/agent:1.4.0

 * /proc is already mounted
 * /run/lock: creating directory
 * /run/lock: correcting owner
   OpenRC 0.48 is starting up Linux 6.2.0-32-generic (x86_64) [DOCKER]

 * Caching service dependencies ... [ ok ]
 * Starting WireGuard interface wg0 ...Warning: `/etc/wireguard/wg0.conf' is world accessible
[#] ip link add wg0 type wireguard
[#] wg setconf wg0 /dev/fd/63
[#] ip -4 address add 10.0.0.1/32 dev wg0
[#] ip link set mtu 1420 up dev wg0
[#] ip -4 route add 10.0.0.2/32 dev wg0
 [ ok ]
 * Starting procustodibus-agent ... [ ok ]
2023-10-02 21:33:26,465 procustodibus_agent.agent INFO: Starting agent 1.4.0
... 1 wireguard interfaces found ...
... 172.17.0.1 is pro custodibus ip address ...
... healthy pro custodibus api ...
... can access host record on api for First Host ...
All systems go :)
Add Another WireGuard Host
To create our second host, navigate to the Hosts page in the web browser:
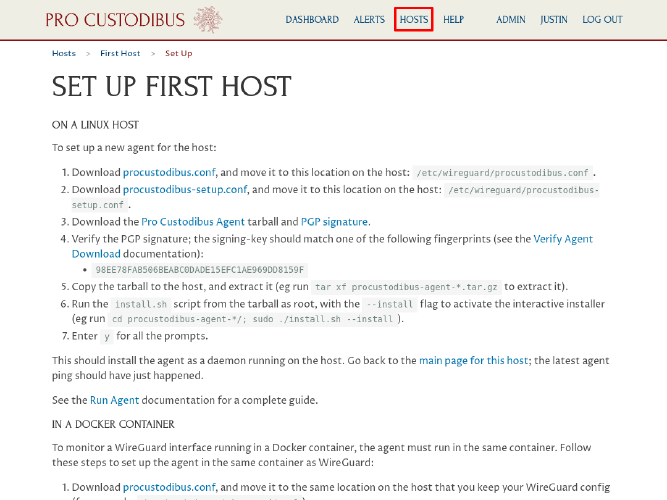
Then click the Add icon in the Hosts panel:
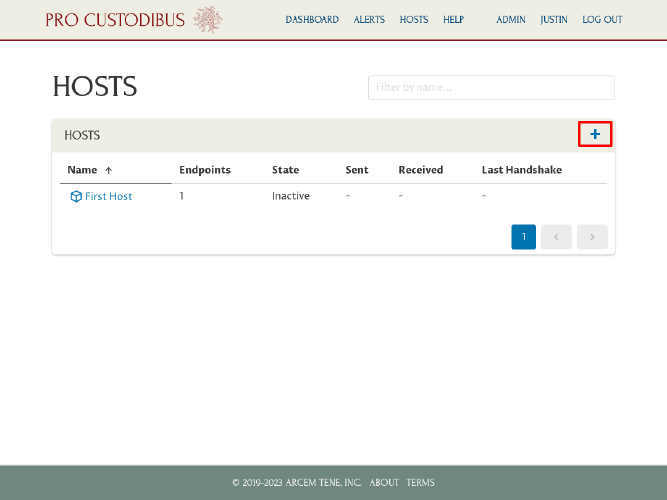
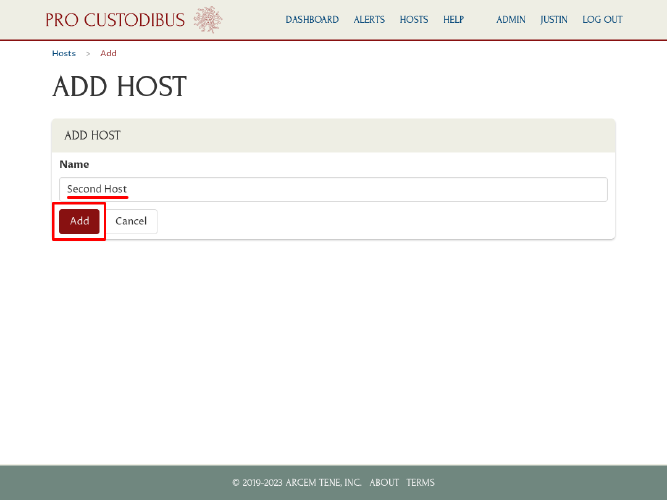
On the Add Host page, enter a display name for the second host in the Name field, and then click the Add button:
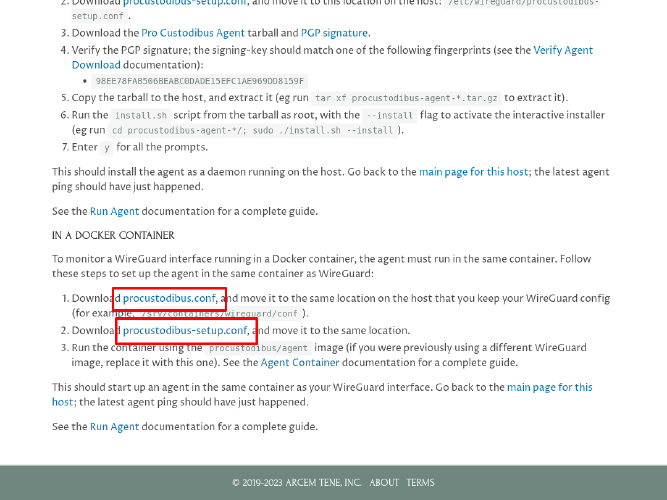
Then download the procustodibus.conf and procustodibus-setup.conf files for the second host:
Run Another Agent
For the second host’s procustodibus.conf file, just like for the first host’s, change the Api setting to point to host.docker.internal instead of localhost:
# procustodibus.conf generated 10/2/2023, 2:42:04 PM PDT
[Procustodibus]
# Second Host Agent
Agent = S4RzC7hbSjm
# Second Host
Host = CKgiw4uMW5H
Api = http://host.docker.internal:8123/api
Then move the second host’s procustodibus.conf and procustodibus-setup.conf files into a new wireguard directory for a “Second Host” container:
$ sudo mkdir -p /srv/containers/second-host/wireguard
$ sudo chown -R $USER:$(id -g) /srv/containers/second-host
$ mv ~/Downloads/procustodibus.conf /srv/containers/second-host/wireguard/.
$ mv ~/Downloads/procustodibus-setup.conf /srv/containers/second-host/wireguard/.
Save another test WireGuard configuration file for the second host as wg0.conf in the same directory:
# /srv/containers/second-host/wireguard/wg0.conf

# local settings for Second Host
[Interface]
PrivateKey = ABBBBBBBBBBBBBBBBBBBBBBBBBBBBBBBBBBBBBBBBFA=
Address = 10.0.0.2/32
ListenPort = 51822

# remote settings for First Host
[Peer]
PublicKey = /TOE4TKtAqVsePRVR+5AA43HkAK5DSntkOCO7nYq5xU=
AllowedIPs = 10.0.0.1/32
Finally, run the following command to start up the Pro Custodibus agent in a new container with the Second Host config files:
$ sudo docker run \
    --add-host host.docker.internal:host-gateway \
    --cap-add NET_ADMIN \
    --name second-host \
    --publish 51822:51822/udp \
    --rm \
    --volume /srv/containers/second-host/wireguard:/etc/wireguard:Z \
    docker.io/procustodibus/agent

 * /proc is already mounted
 * /run/lock: creating directory
 * /run/lock: correcting owner
   OpenRC 0.48 is starting up Linux 6.2.0-32-generic (x86_64) [DOCKER]

 * Caching service dependencies ... [ ok ]
 * Starting WireGuard interface wg0 ...Warning: `/etc/wireguard/wg0.conf' is world accessible
[#] ip link add wg0 type wireguard
[#] wg setconf wg0 /dev/fd/63
[#] ip -4 address add 10.0.0.2/32 dev wg0
[#] ip link set mtu 1420 up dev wg0
[#] ip -4 route add 10.0.0.1/32 dev wg0
 [ ok ]
 * Starting procustodibus-agent ... [ ok ]
2023-10-02 21:44:39,809 procustodibus_agent.agent INFO: Starting agent 1.4.0
... 1 wireguard interfaces found ...
... 172.17.0.1 is pro custodibus ip address ...
... healthy pro custodibus api ...
... can access host record on api for Second Host ...
All systems go :)
Generate Test Traffic
Now, to generate some test traffic between our two test WireGuard containers, first run the following series of commands for the second host in a new terminal (setting up a basic TCP listening service with netcat):
$ sudo docker exec -it second-host sh
/ # apk add netcat-openbsd
fetch https://dl-cdn.alpinelinux.org/alpine/v3.18/main/x86_64/APKINDEX.tar.gz
fetch https://dl-cdn.alpinelinux.org/alpine/v3.18/community/x86_64/APKINDEX.tar.gz
(1/3) Installing libmd (1.0.4-r2)
(2/3) Installing libbsd (0.11.7-r1)
(3/3) Installing netcat-openbsd (1.219-r1)
Executing busybox-1.36.1-r2.trigger
OK: 300 MiB in 80 packages
/ # nc -klp 1234
And then run the following series of commands for the first host in another new terminal (sending some traffic to the listening second host):
$ sudo docker exec -it first-host sh
/ # apk add netcat-openbsd
fetch https://dl-cdn.alpinelinux.org/alpine/v3.18/main/x86_64/APKINDEX.tar.gz
fetch https://dl-cdn.alpinelinux.org/alpine/v3.18/community/x86_64/APKINDEX.tar.gz
(1/3) Installing libmd (1.0.4-r2)
(2/3) Installing libbsd (0.11.7-r1)
(3/3) Installing netcat-openbsd (1.219-r1)
Executing busybox-1.36.1-r2.trigger
OK: 300 MiB in 80 packages
/ # echo hello world | nc -q0 10.0.0.2 1234
/ #
If we switch back to the terminal of the listening netcat service on the second host, we should see our “hello world” message output:
/ # nc -klp 1234
hello world
View WireGuard Logging and Configuration
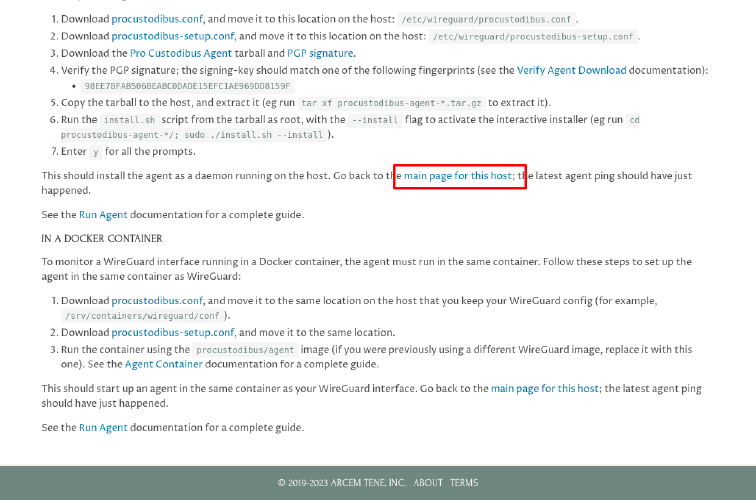
Now if we switch back to the web browser, and navigate to the main page of the second host:
We should see some traffic shown in the host’s charts and tables:
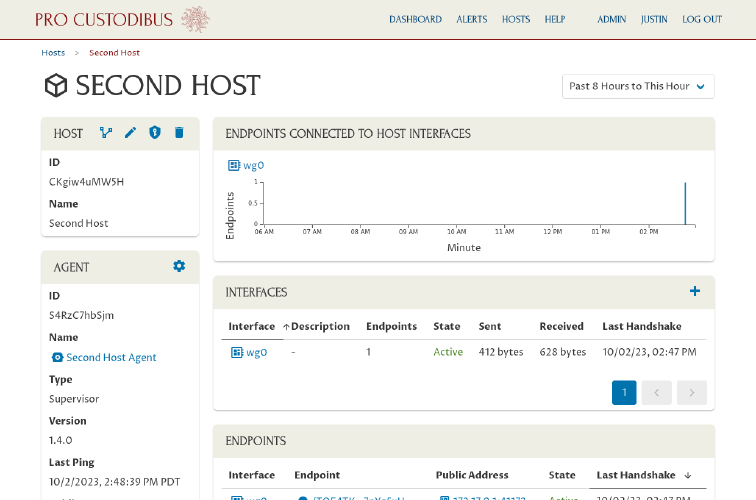
(If not, wait a minute, and then refresh the page.)
To view (or edit) the configuration details of the host’s WireGuard interface, click the interface’s name in one of the panels:
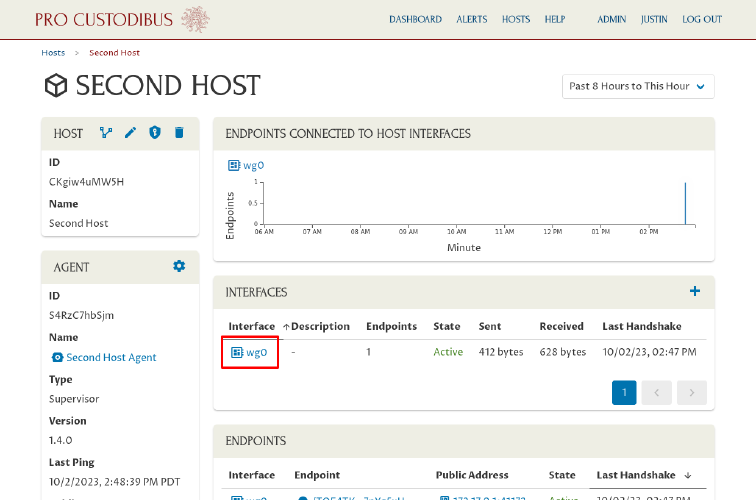
And to view (or edit) the configuration details for the endpoint to the first host from the second host, click the peer name used by the first host in one of the panels:
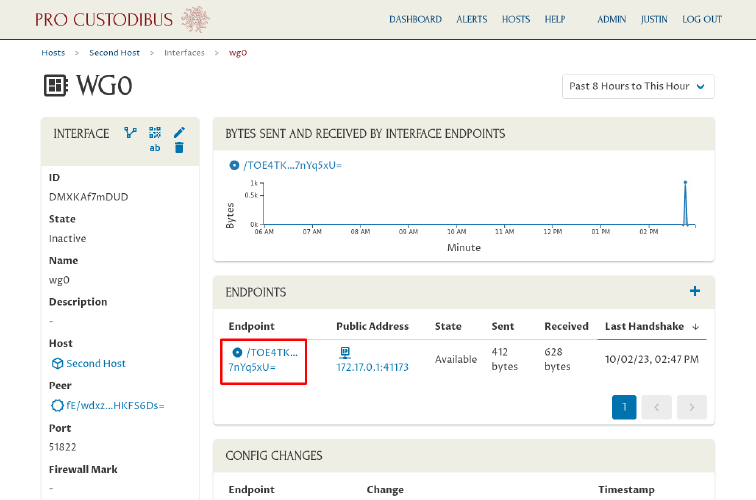
To edit the peer’s name (and see its other usages), click its name in the Peer field of the Endpoint panel:
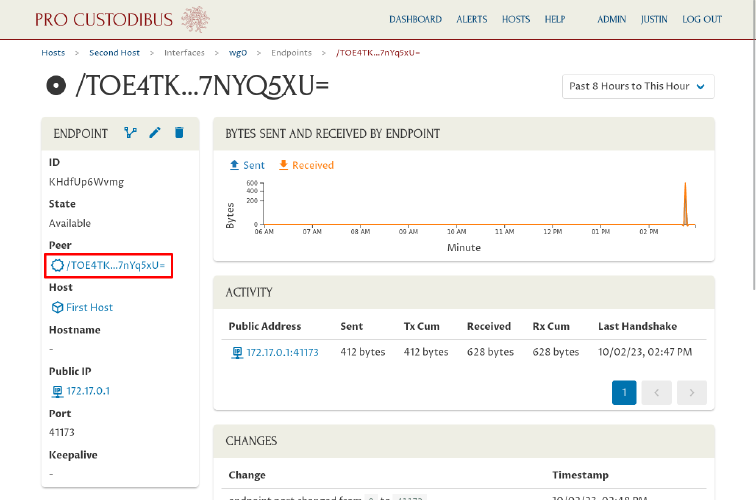
Click the Edit icon in the Peer panel to edit its name:
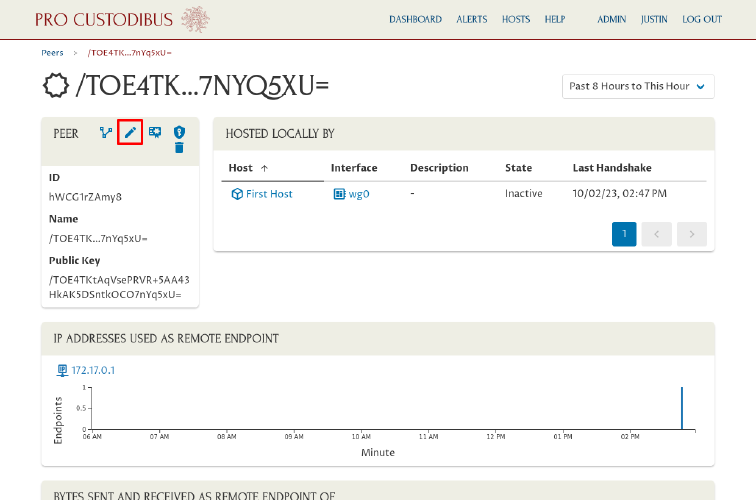
Enter a better name like “Peer One” in Name field; then click the Update button:
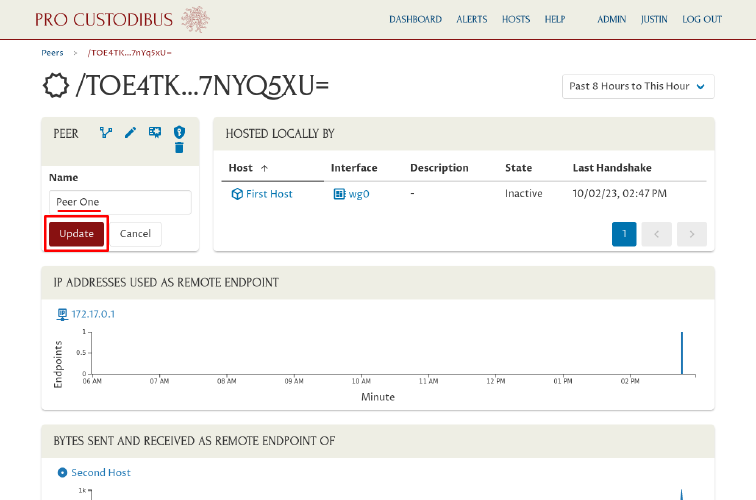
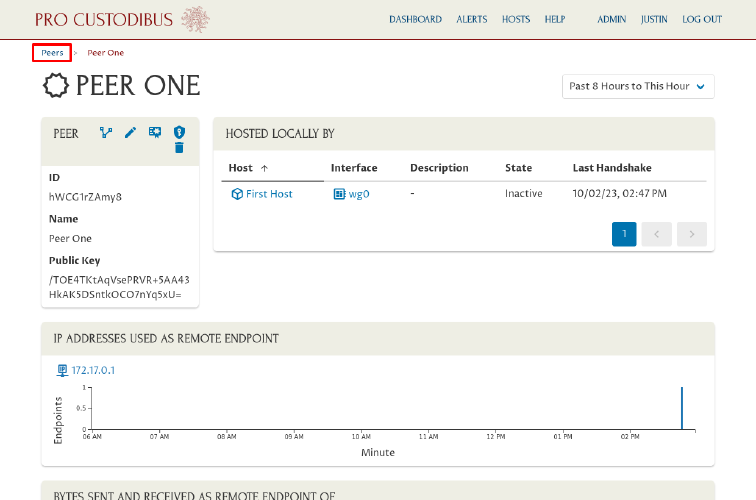
Navigate to the Peers page, and do the same for the other peer (name it “Peer Two”):
Then navigate to the dashboard. From here we can get an nice overview of what’s happened so far in our test WireGuard network:
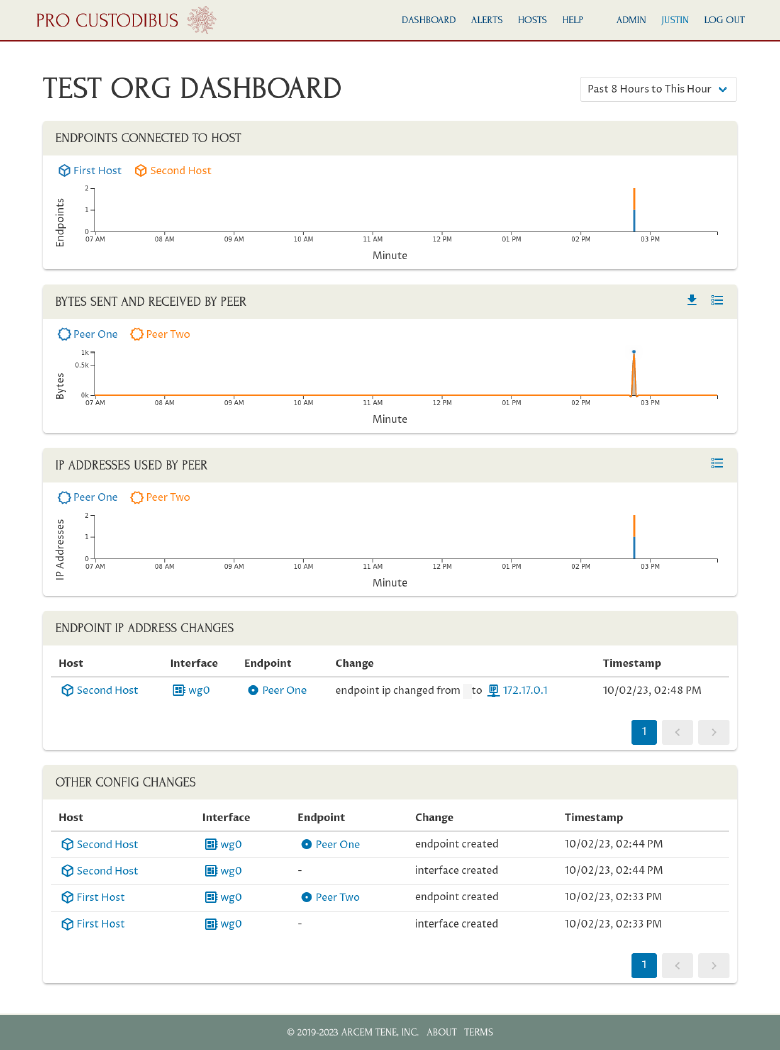
Click on any host or peer names in the charts of the dashboard to navigate to the details page for the host or peer, to see more information about the host or peer, or make changes to its configuration.
Next Steps
See our How To Guides for other things you can do now that you have Pro Custodibus up and running. And see our On-Premises Documentation for more information about the configuration and operational details of running Pro Custodibus on-premises.