Rolling Back WireGuard Changes
One important feature of Pro Custodibus is that it keeps track of all changes made to your WireGuard config files on monitored hosts. If you ever make a mistaken update to a WireGuard config file, or need to roll back an intentional change, you can do so easily with the Pro Custodibus UI. This article will show you how; we’ll cover these four scenarios:
Fix Overwritten Config
Let’s say we accidentally copied over the working configuration for a WireGuard interface on one host with the WireGuard config from a different host, and restarted the interface. Whoops! Normally, if we didn’t have a backup of our WireGuard config, it’d be gone forever. However, with Pro Custodibus, we can fix this easily.
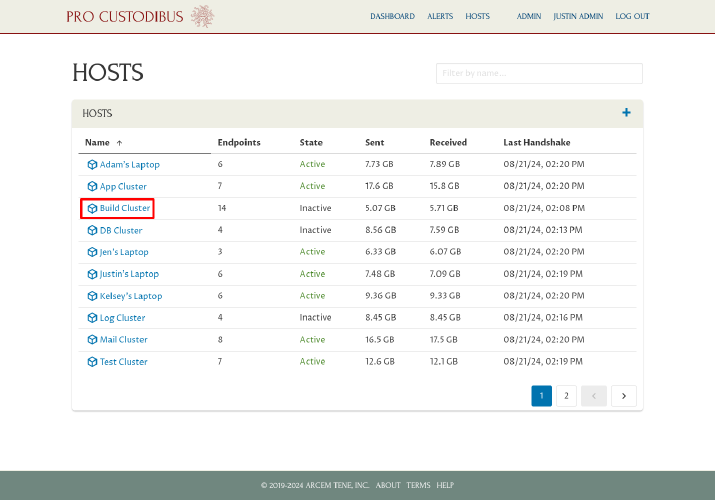
We simply log into Pro Custodibus, and find the host in the Hosts list. Click the name of the host (for example, Build Cluster) to view its details:
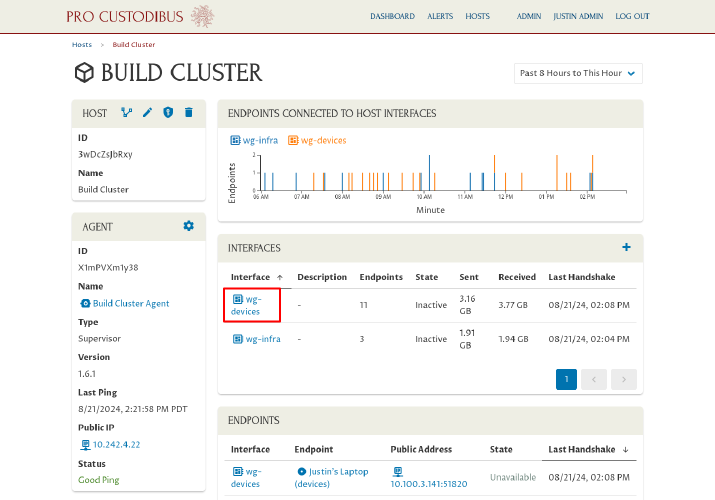
From there, click the name of the interface we screwed up (for example, wg-devices) to view its details:
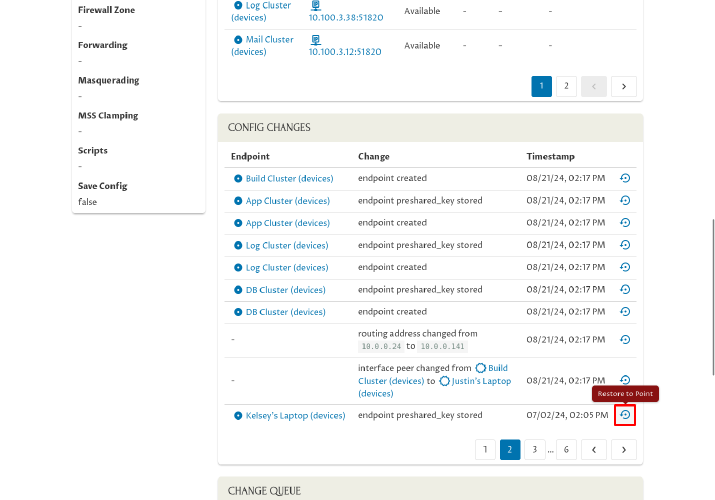
On the interface page, scroll down to Config Changes panel. This panel shows each individual config change to the interface. Find the last good change, and click the Restore to Point icon corresponding to that change:
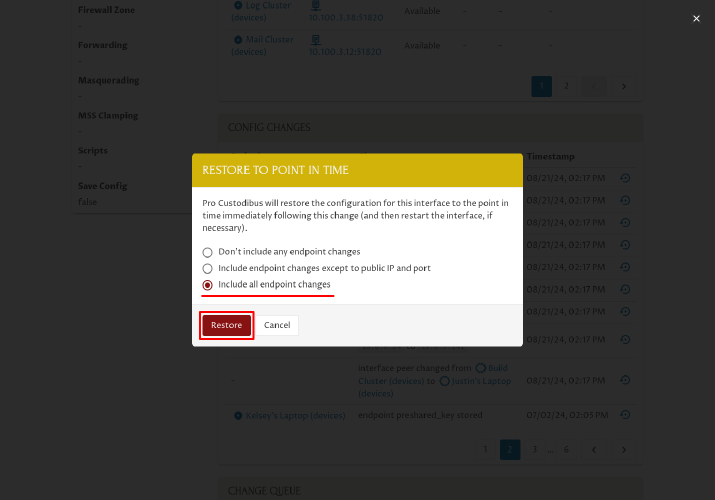
A modal dialog will pop up, asking us if we want to roll back the changes just to the interface, or also to all of its endpoints. We want to roll back everything, so select the Include all endpoint changes option, and click the Restore button:
|
Tip
|
If the endpoints have dynamic IP addresses (like the endpoints of a “hub” or “site” host), you might rather select the Include endpoint changes except to public IP and port option. This will avoid writing the endpoint IP addresses and ports to the interface config file (when those addresses are going to change all the time anyway). |
The page with reload; scroll down to the Change Queue panel to see the changes that Pro Custodibus has queued up to restore the interface:
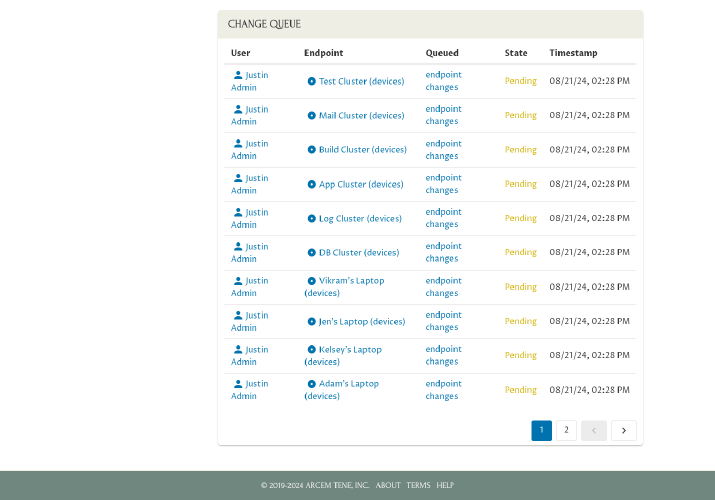
In a minute or two, the Pro Custodibus agent on the host will download this list of changes, and apply them to the messed-up interface, restoring it the last good version of the interface.
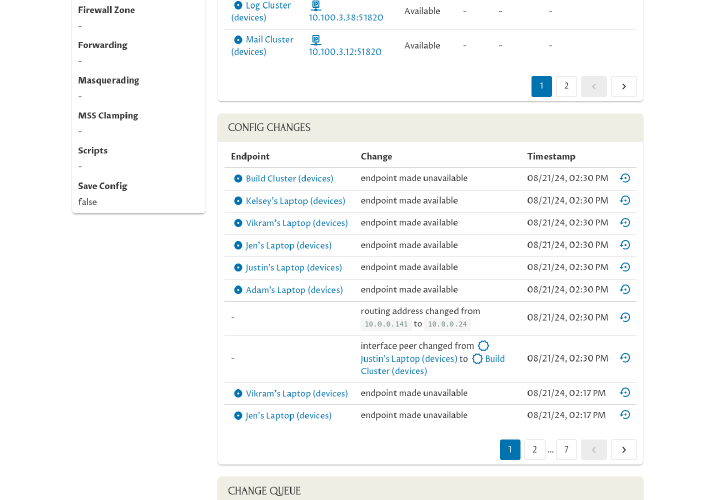
So refresh this page in a minute or two, scroll back to the Config Changes panel, and we’ll see all the changes Pro Custodibus has made to restore the interface to its working state:
Roll Back Interface Change
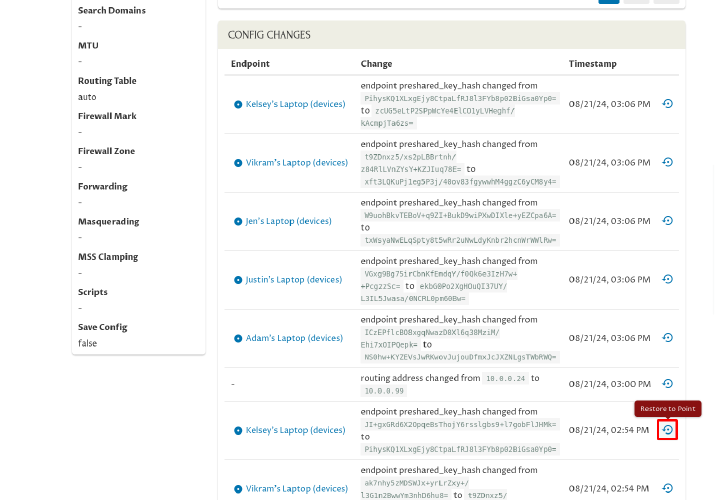
Now let’s say we make a few more changes to this interface, like to change its address, and then rotate the preshared keys of its endpoints. After we do that, however, we realize we want to roll back the interface address change — but keep the preshared key changes.
To do this, find the last good change in the interface’s Config Changes panel (in this example, the change directly before we changed the interface’s address), and click the Restore to Point icon corresponding to that change:
In the resulting dialog, select the Don’t include any endpoint changes option; then click the Restore button:
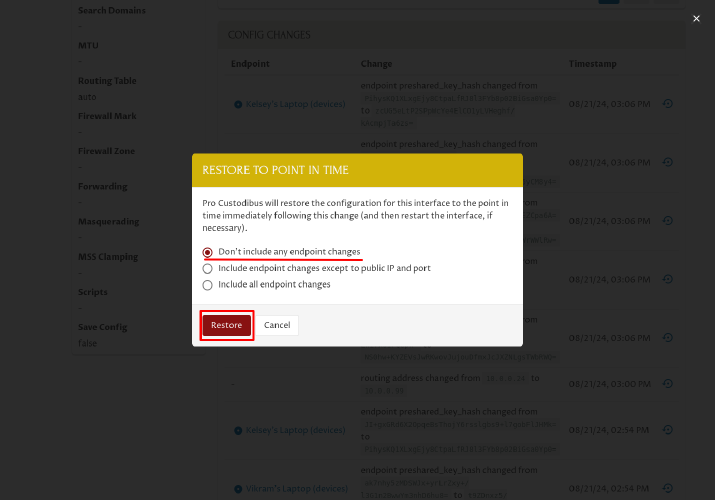
This will queue the changes to restore the interface’s own properties only (like its address), while leaving alone the configuration of the individual endpoints (like their preshared keys).
Refresh this page in a minute or two, then scroll back to the Config Changes panel, and we’ll see that all Pro Custodibus has restored is the interface’s address:
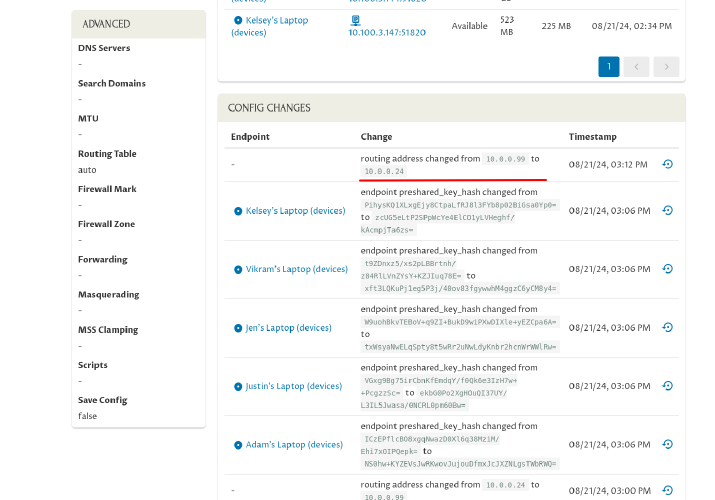
Roll Back Endpoint Change
Now let’s say we want to roll back a change to just one of the interface’s endpoints — like to restore just the preshared key of Adam’s Laptop to its previous value — and keep our changes to all the other endpoints. We can do this by navigating to the particular endpoint we want to restore (Adam’s Laptop):
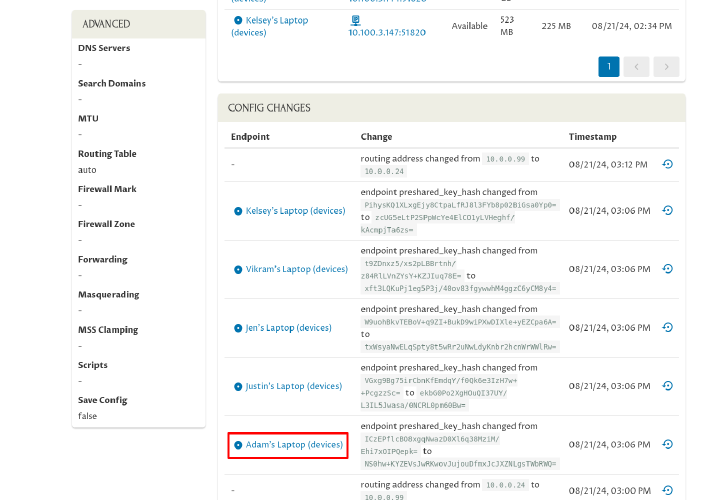
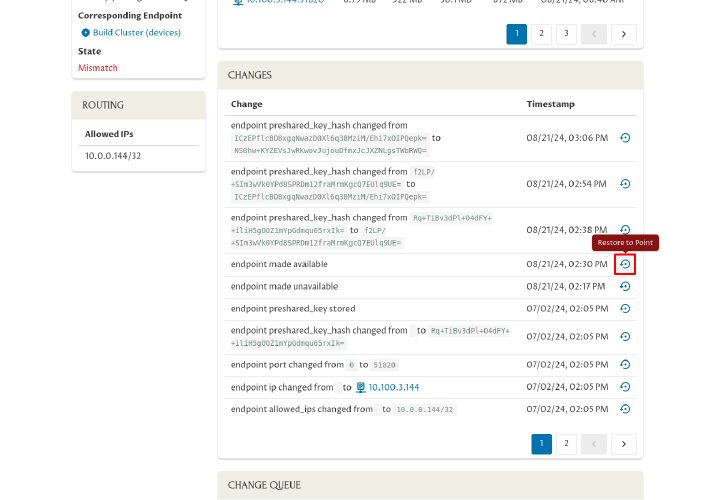
On the endpoint page, scroll down to Changes panel. This panel shows each individual config change to this specific endpoint. Find the last good change, and click the Restore to Point icon corresponding to that change:
In the resulting dialog, select the Include changes except to public IP and port option; then click the Restore button:
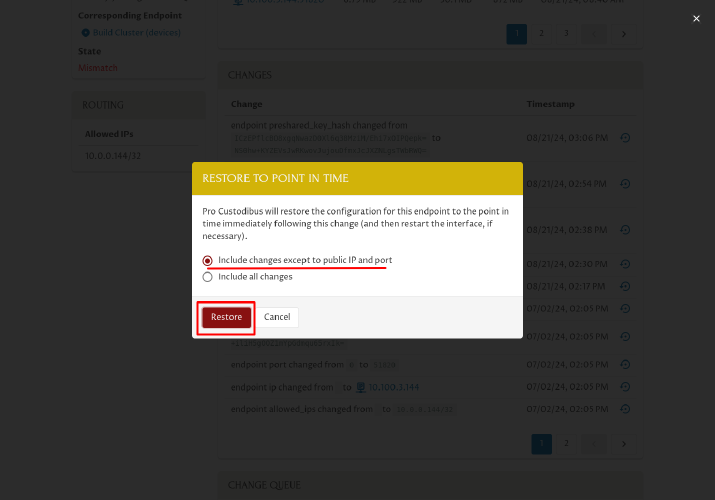
This will queue the changes to restore only the endpoint’s preshared key (while leaving any recent changes to the endpoint’s public IP address or port alone).
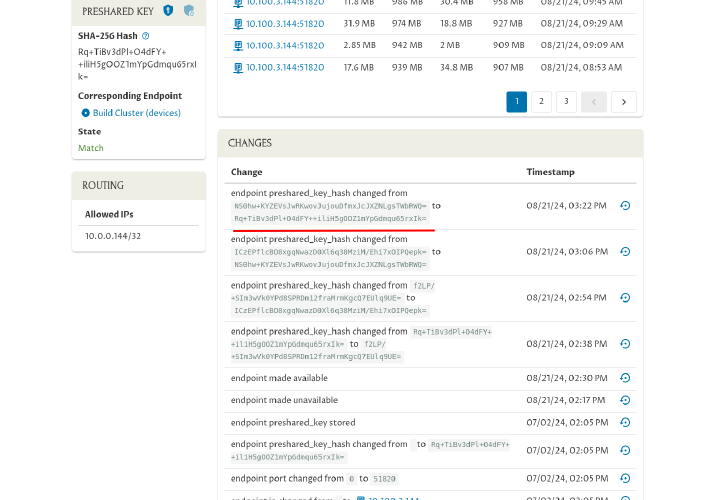
Refresh this page in a minute or two, scroll back to the Changes panel, and we’ll see that Pro Custodibus has restored the endpoint’s preshared key:
Transfer to Replacement Host
Finally, let’s say we want to decommission an old host (like an old build server), and replace it with a new host (a new build server) that provides the same functionality — including all the same WireGuard settings and configuration.
One way to approach this would be to copy the WireGuard config files directly from the old host to the new; set up the Pro Custodibus agent on the new host; and then either connect the agent on the new host to a new host record on Pro Custodibus, or (after shutting down the old host) connect it to the old host’s existing host record on Pro Custodibus.
However, we might skip (intentionally or by accident) the step where we copy the WireGuard config files over from the old host to the new. If we did that, we could connect the agent on the new host to the old host record on Pro Custodibus, and use Pro Custodibus’ roll-back functionality to “restore” the old host’s configuration over the new host’s currently non-existent WireGuard configuration.
To do this, first shut down the Pro Custodibus agent running on the old host. If the old host is running Liunx with systemd, we’d run the following command on the old host:
$ sudo systemctl stop procustodibus-agent
|
Tip
|
You probably will also want to run the following command to prevent the agent from starting up again if the old host is rebooted: |
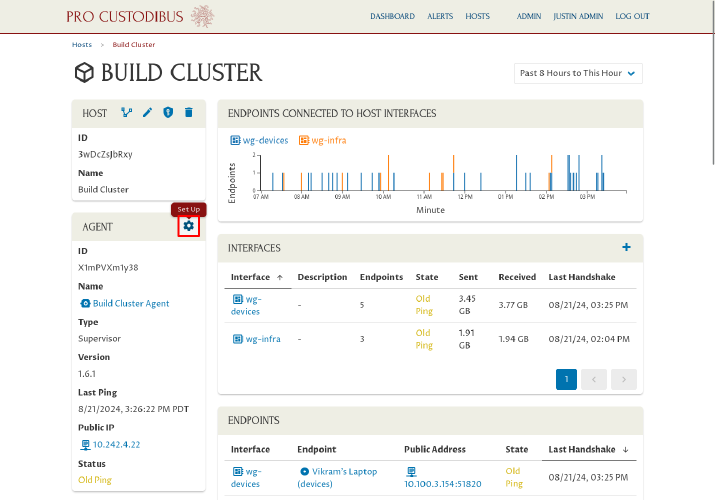
Next, navigate to the main page for the host, and click the Set Up icon in its Agent panel:
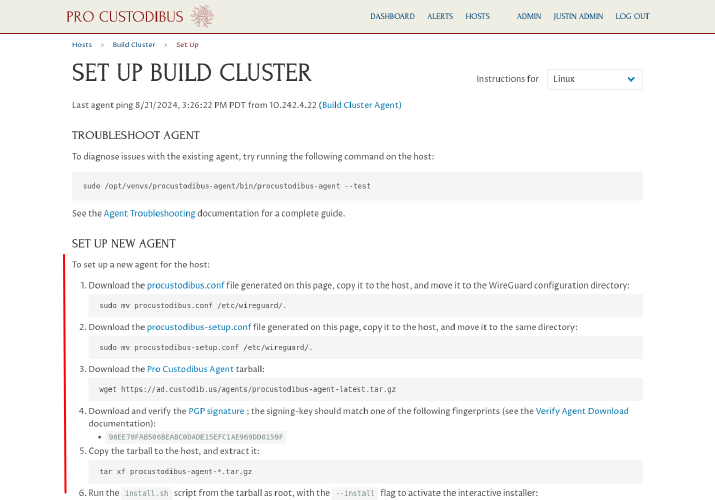
Then follow the Set Up New Agent instructions on this page to set up an agent on the new host:
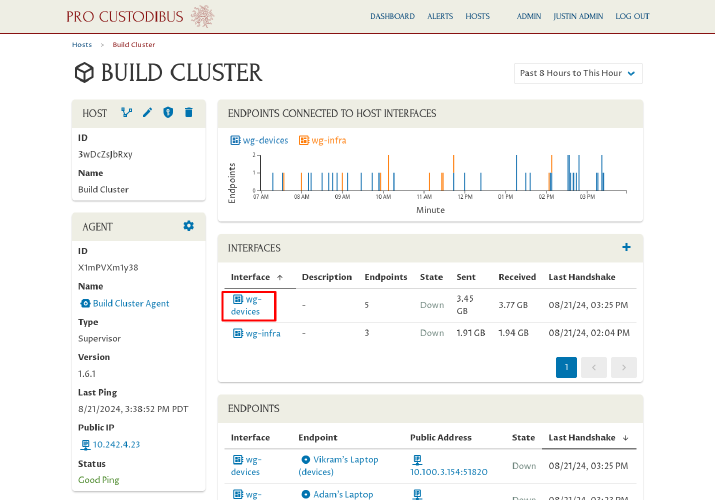
Once finished with those steps, return to the main page for the host. We should see a recent ping from the agent on the new host — and also that the old WireGuard interfaces are now Down. So we now need to find the interfaces’ last good state as captured by the agent on the old host, and restore it to the new host. Click the name of the first interface on this page:
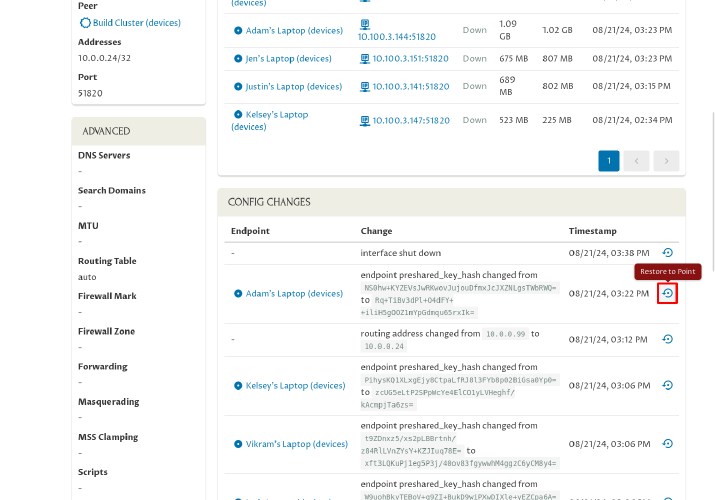
On the interface page, scroll down to Config Changes panel, and click the Restore to Point icon corresponding to the last good change on the old host:
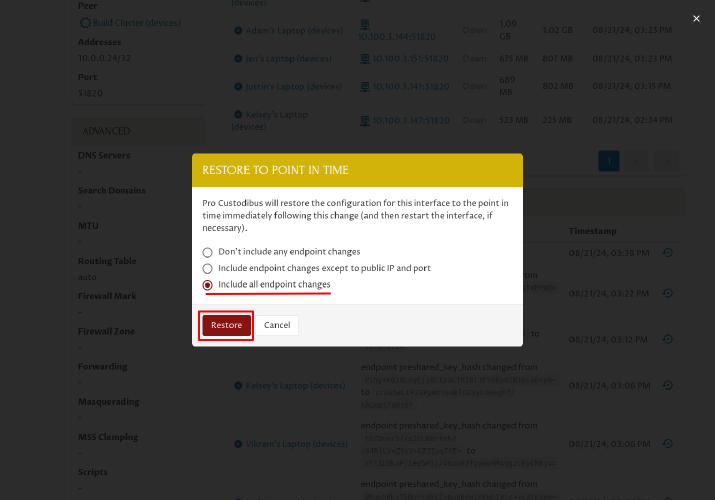
In the resulting dialog, select the Include all endpoint changes option; then click the Restore button:
|
Tip
|
If the endpoints have dynamic IP addresses (like the endpoints of a “hub” or “site” host), you might rather select the Include endpoint changes except to public IP and port option. This will avoid writing the endpoint IP addresses and ports to the interface config file (when those addresses are going to change all the time anyway). |
This will queue the changes needed to restore the full configuration from the old host — and in a minute or two, the Pro Custodibus agent on the new host will download those changes and apply them.
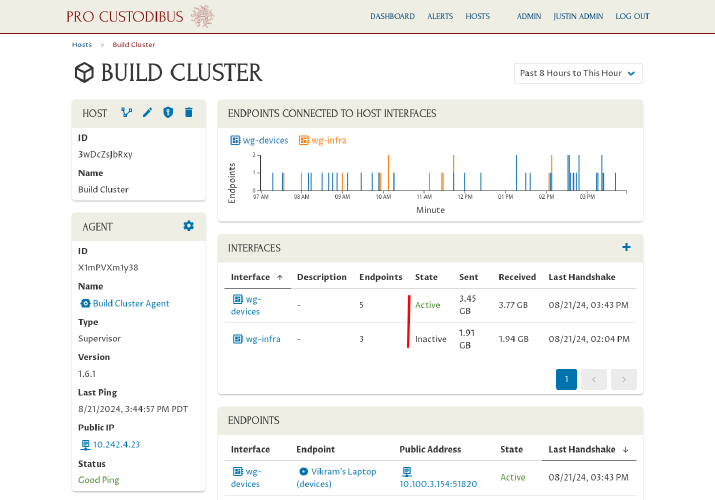
If the host has more than one WireGuard interface, return back to the main page for the host and do the same thing for each interface. Once the agent has applied each set of changes, the interfaces on the new host should be listed as Inactive (or Active if they’re already in active use):
If the new host has the same public IP address or DNS name as the old host, its endpoints should be able to connect back to it automatically. If not, you will have to reconfigure the endpoints on the other side of the connection of the new host to use the new host’s public IP address.